- Video Production
- Video Making Tips for Beginners
- How to Make Creative Videos
- How to make a family video
How to Make a Family Video That Captures Real Life, Not Perfect Takes
Learning how to make a family video isn’t just about pressing record—it’s about preserving the raw, beautiful fragments of your family’s story for generations to come.
Imagine this: Your toddler takes their first wobbly steps, or your teenager shares a heartfelt story at the dinner table. These fleeting moments—raw, messy, and beautiful—are the glue that holds your family’s story together.
But how do you ensure these moments don’t slip away?
 Learn how to make a family video that captures everyday magic.
Family videos aren’t just clips; they’re time capsules of love, growth, and connection.
In this guide, we’ll walk through everything you need to craft a family video that feels authentically yours. Whether you’re capturing your child’s birthday, a lazy Sunday morning, or a milestone moment, we’ll keep it simple, stress-free, and focused on what really matters: preserving the magic of your people.
No complicated jargon, no perfect edits—just heartfelt memories, you’ll treasure for years.
Let’s turn those everyday moments into something timeless. Let’s begin.
Key Takeaways: How to make a family video
- Capture candid, everyday moments: Prioritize raw, unscripted interactions (e.g., laughter, play, milestones) over staged perfection to preserve your family’s authentic story.
- Start simple with accessible tools: Use smartphones and free apps like CapCut or iMovie for filming and editing—no professional gear or expertise required.
- Organize systematically: Create labeled folders, use descriptive filenames (include dates/events), and back up files across cloud, external drives, and computers to avoid clutter and loss.
- Edit with purpose: Focus on short, thematic clips (15–30 seconds), delete bloopers, and pair with royalty-free music or text overlays to enhance storytelling.
- Involve the whole family: Encourage kids and relatives to film or narrate, adding diverse perspectives to your memory archive.
- Prioritize backups and formats: Save videos as MP4s and store copies in multiple locations (cloud, external drives) for long-term accessibility.
- Share privately and meaningfully: Use unlisted YouTube links, USB drives, or shared folders to protect privacy while connecting loved ones.
- Embrace imperfection: Shaky clips, background noise, and spontaneous moments add authenticity, making memories more relatable and cherished over time.
This section is a guest post from one of our web visitors...
"Why I Started Making Family Videos": A Mother’s Perspective and Journey into Family Videography
By Bernadette M. Morales (Muntinlupa City, Philippines)
 (from left) My hubby Jethro, my son Noah, my daughter Faith, and Me.
I'm creating videos to preserve priceless family memories—memories that always bring smiles and warmth to our home.
I have a confession: it took courage to share my story here. I wasn't sure if it was appropriate for someone like me, without professional video experience, to offer insights. My primary role is a housewife and mother to two energetic young children, a three-year-old and a one-year-old (at the time of writing).
Despite my busy days, I manage to steal moments to capture special happenings around me. I'm especially excited to film my children's sweet moments:
- Their genuine smiles, laughs, and giggles.
- Their funny, adorable antics.
- Their joyful play and blossoming personalities.
I've also cherished capturing milestones:
- Their first words.
- Their first attempts at crawling.
- Their wobbly first steps.
Whenever these moments occur, I grab my smartphone and start recording.
As a wife and mother, stress is a constant companion. However, watching my children's achievements and progress brings immense joy. I don't want to miss a single precious moment.
At night, after the children are asleep, I review the day's videos. Even after countless viewings, the excitement remains. I never tire of watching them.
Whether I'm an enthusiast or simply someone who loves capturing memories, I'm grateful for this way to archive our family's story, especially my children's journey.
Bernadette's story beautifully illustrates that you don't need professional equipment or expertise to create meaningful family videos.
Her experience emphasizes the importance of capturing candid, everyday moments and the joy of revisiting those memories.
Why Should You Create a Family Video?
Family videos preserve irreplaceable moments, turning fleeting laughs, voices, and everyday magic into timeless keepsakes.
Life moves fast—days blur into years, children outgrow their shoes, and even the loudest memories fade to whispers. But hitting “record” lets you freeze time.
Here’s a short family video my wife and I made when our daughter, Mariel, was still learning how to pedal a bike.

Imagine rediscovering a clip of your daughter’s first birthday years later: her tiny hands smashing cake into her hair, that giddy toddler giggle you’d almost forgotten.
These videos become emotional time capsules, capturing not just milestones but the heartbeat of your family—grandpa’s signature joke at reunions, the chaos of a living room dance party, or the way your dog always photobombed bedtime stories.
The best part? Family videos thrive on imperfection. No need for fancy equipment or flawless takes. Shaky camera work, bedhead, and barking dogs? They’re proof of life’s messy, beautiful reality.
For beginners, this makes family projects the ideal starting point. You’ll learn to chase candid moments, stitch clips into heartfelt stories, and realize that even a 30-second snippet can say more than a thousand photos.
So, grab your phone, hit record, and start building your treasure chest of moments. Years from now, you’ll be grateful you did.
How to Organize Family Videos (Before You Even Press “Record”)
Let’s be honest: Without a plan, those video clips can quickly turn into a digital avalanche. You’ll end up with hundreds of shaky clips named “VID_00123” buried in your camera roll, wondering, “When was this? Why did I film the ceiling for 10 seconds?!”
But don’t worry—this isn’t about perfection. It’s about making your future self’s life easier (and saving hours of frustration).
Here’s how to organize your family videos before you start filming:
- Start with a Simple Folder System
- Name Your Files Like a Pro
- Backup, Backup, Backup
- Delete the Bloopers (Yes, Really!)
- Transfer and Sort Regularly
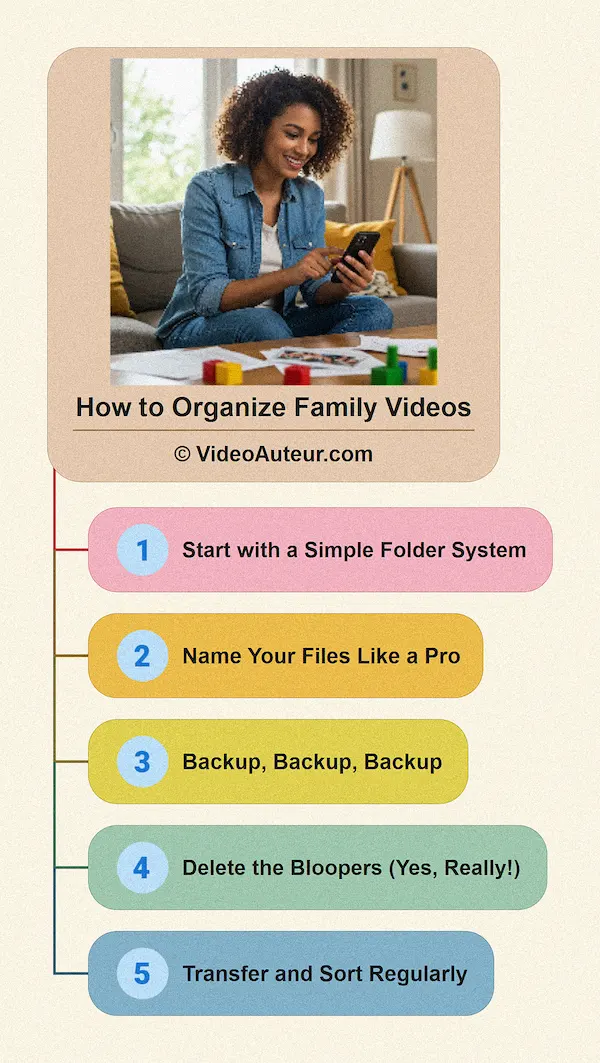 How to Make a Family Video: Organizing Family Video Files
Start with a Simple Folder System
Think of folders like drawers in a memory cabinet. Label them clearly so you know exactly where to find things later. For example:
- By event: “Mariel’s First Bike Ride,” “2025 Summer Beach Trip”
- By theme: “Sunday Breakfasts,” “Grandpa’s Stories,” “Kitty’s First Year”
- By date: “December 2024,” “Holidays 2025”
Personal tip:
My wife and I use an external hard drive with folders for every milestone—like our daughter’s interpretive reading at school or her dance performances on stage. It’s a lifesaver when we want to revisit those moments!
Name Your Files Like a Pro
“VID_00579” tells you nothing. Instead, use short, descriptive names that include:
- Date: 2024-07-04 (start with the year for easy sorting!)
- Event/location: BeachTrip
- Key details: MarielLearnsToSwim
Example: “2024-12-20_BeachTrip_MarielLearnsToSwim”. This way, you’ll know exactly what’s in the clip at a glance.
Backup, Backup, Backup
Imagine losing years of videos because your laptop crashed. Ouch. Protect your memories with:
- Cloud storage: Apps like Google Photos, iCloud, or Dropbox automatically back up your videos and sort them by date.
- External hard drives: These are perfect for long-term storage (and they’re affordable!).
- Your computer’s internal storage: Keep a copy here for quick access.
Personal tip:
We use all three! Cloud for convenience, external drives for bulk storage, and our computer for recent projects. Better safe than sorry.
Delete the Bloopers (Yes, Really!)
That 3-minute clip of your cat blocking the camera? The 10 takes of your toddler refusing to blow out candles? Be ruthless. Keep only the best 10–20 seconds of each moment.
Personal habit:
We delete bloopers right after filming—even emptying the phone’s recycle bin. It saves storage space and makes editing feel less overwhelming later.
Transfer and Sort Regularly
Don’t let videos pile up on your phone! Once a week (or after a big event),:
- Transfer clips to your computer.
- Sort them into your labeled folders.
- Back them up to the cloud or external drive.
This tiny habit takes minutes but saves hours of digging through chaos later.
--
Remember: Organization isn’t about rigid rules—it’s about making your memories easy to enjoy. Set up a system that feels natural to you, and tweak it as you go.
With a little prep, you’ll spend less time sorting and more time reliving those priceless moments.
What Is the Best Way to Capture Family Memories?
Let’s start with a truth bomb: The most precious family memories aren’t the ones where everyone’s posing perfectly in matching outfits. They’re the messy, unscripted, real moments—like your toddler smearing peanut butter on the dog, your teenager cracking up at a terrible dad joke, or your partner dancing badly to ’80s hits while washing dishes.
These slices of life might feel ordinary now, but years later, they’ll be the ones that make your heart swell.
Here’s the good news: You don’t need a fancy camera or a film crew to capture magic. You just need to embrace the chaos and keep it simple.
Here's how...
- Chase “Invisible” Moments (Not Perfection)
- Be a Ninja with Your Camera
- Light and Steady Wins the Race
- Think Mini-Movies, Not Marathons
- Involve Your Crew
- Trust the Story (Even If You Can’t See It Yet)
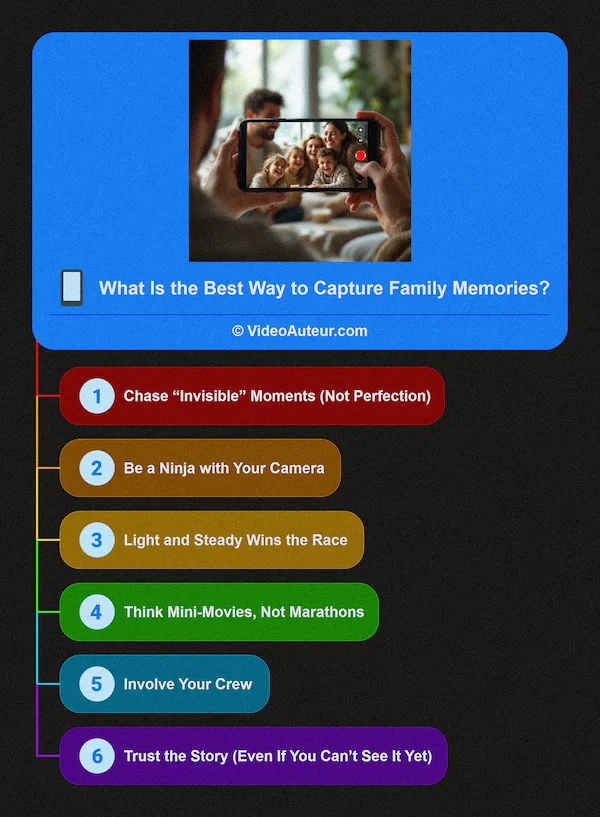 How to Make a Family Video: Ways to Capture Family Memories on Video
1. Chase “Invisible” Moments (Not Perfection)
Resist the urge to stage scenes or wait for “big” events. The gold is in the everyday:
- Film the mundane: Breakfast chaos, bedtime story negotiations, sidewalk chalk masterpieces.
- Let emotions lead: Focus on genuine laughter, furrowed brows during homework, or the quiet look of pride when your kid ties their shoes.
2. Be a Ninja with Your Camera
Your goal? Capture life as it happens, without interrupting the flow:
- Keep your phone handy: Tuck it in your pocket or leave it on the kitchen counter. Spontaneous moments wait for no one.
- Silence is golden: Don’t ask kids to “perform” for the camera. Let conversations unfold naturally—even the pauses matter.
- Hold the shot longer: Record for 10–15 seconds instead of quick snippets. This gives you breathing room to trim later.
3. Light and Steady Wins the Race
A few tiny tweaks can make your videos feel polished without effort:
- Use natural light: Film near windows or outdoors. Harsh shadows? Just shift slightly until everyone’s face glows softly.
- Keep it steady: No tripod? Rest your elbows on a table or lean against a wall. Your future self will thank you for less motion sickness.
4. Think Mini-Movies, Not Marathons
Short clips are your friend:
- Aim for 15–30 seconds per scene: Enough to capture the vibe without draining your phone’s storage.
- Exceptions welcome: Obviously, film your child’s entire school play if you want to! But for daily moments, brevity keeps editing manageable.
5. Involve Your Crew
Make it a family affair:
- Pass the camera: Let kids film their perspective (prepare for ceiling shots and close-ups of the cat).
- Ask open questions: “What’s the funniest thing that happened today?” or “Show me your dinosaur roar!” works better than “Say cheese!”
6. Trust the Story (Even If You Can’t See It Yet)
You’re not just filming clips—you’re gathering puzzle pieces for a bigger picture. That 10-second video of your dad teaching your daughter to ride a bike? It’ll pair beautifully with the clip of her zooming down the driveway solo six months later.
--
Remember: Your family’s story is happening right now, in the laundry-folding, Lego-building, pancake-flipping moments.
Don’t overthink it. Hit record, soak in the magic, and let the camera do the rest.
What to Do with Video Clips of Kids
You’ve captured those adorable giggles, messy snack times, and backyard adventures—now what? Those clips are more than just files on your phone. They’re tiny sparks waiting to become heirlooms.
Here’s how to turn them into something you’ll love revisiting for years:
- Start Small: Edit with Free, Simple Tools
- Create Mini-Movies with Themes
- Preserve Their Voice (Literally)
- Mix Photos + Videos for Nostalgia Overload
- Share Privately (Without Social Media)
- Build a Growth Timeline
- Write Letters to the Future
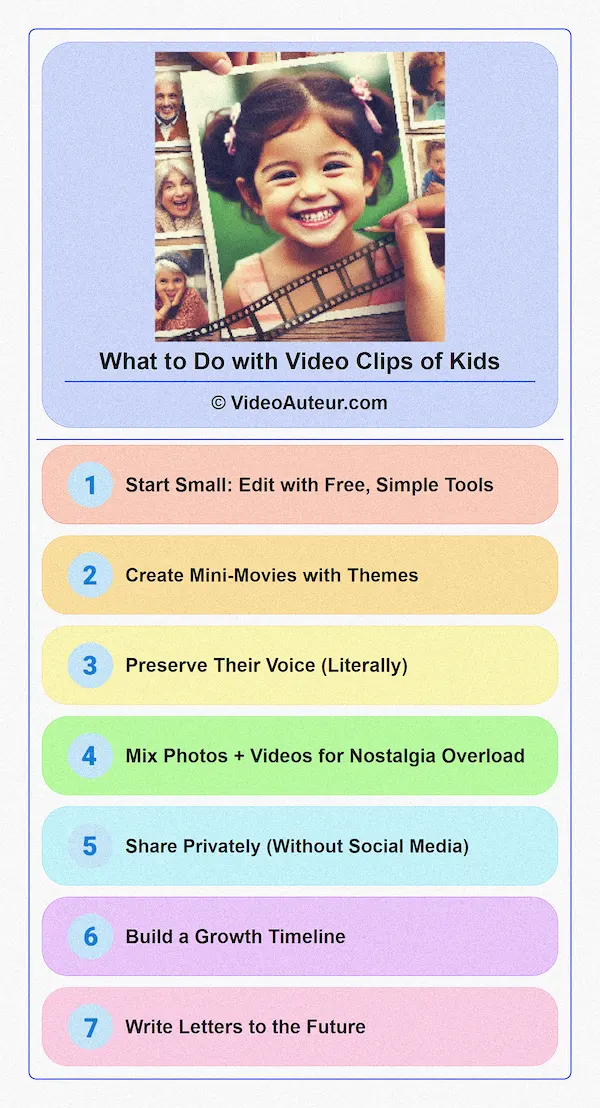 How to Make a Family Video: Turning Video Clips of Kids into Something You’ll Love Revisiting for Years
1. Start Small: Edit with Free, Simple Tools
Don’t let fancy software intimidate you. Use beginner-friendly apps to polish your clips in minutes:
- CapCut (mobile/desktop): Perfect for trimming clips, adding transitions, and layering music.
- iMovie (iOS/Mac) or Clipchamp (browser-based): Drag-and-drop simplicity for stitching moments together.
- YouTube Audio Library: Pair your videos with royalty-free tunes (search by mood: “whimsical,” “nostalgic,” etc.).
Pro tip: Start with just 5–10 clips. Less editing = less stress.
2. Create Mini-Movies with Themes
Group clips into bite-sized stories that tug at the heartstrings:
- Milestone magic: “First Steps to First Day of School,” “Learning to Ride a Bike”
- Seasonal snapshots: “Summer 2024: Splash Pads & Ice Cream,” “Holidays at Grandma’s”
- Quirky collections: “The Great Bedtime Story Debates,” “Best Mud Puddle Jumps”
Personal favorite: My wife makes annual school-year recaps for our daughter—homework triumphs, extracurricular activities, and all.
Sometimes, we become teary-eyed when we rewatch them.
3. Preserve Their Voice (Literally)
Kids’ perspectives change fast. Capture their now with:
- Mini-interviews: Ask questions like, “What’s your superpower?” or “Describe your best day ever.”
- Commentary clips: Film them narrating their art projects, LEGO creations, or backyard bug hunts.
Pro tip: Save these clips in a “Time Capsule” folder to revisit when they’re older.
4. Mix Photos + Videos for Nostalgia Overload
No rule says you need only video! Blend both for dynamic slideshows:
- Pair moments: A video of your child blowing out birthday candles + a photo of their cake-smeared face.
- Add slow zooms: Use apps like Canva or CapCut to animate photos with subtle movement.
5. Share Privately (Without Social Media)
Keep precious moments intimate:
- Google Drive: Create a shared folder for grandparents and close family.
- Private YouTube links: Upload as “unlisted” and share via email or text.
- Old-school USB drives: Gift a curated video to relatives who aren’t tech-savvy.
6. Build a Growth Timeline
Show how far they’ve come:
- Annual montages: Combine clips from each year (ages 1–5, school years, etc.).
- Side-by-side comparisons: Edit clips of them mastering a skill—like riding a scooter at 3 vs. 6 years old.
7. Write Letters to the Future
Record heartfelt messages they’ll open later:
- Parent-to-child notes: “What I love about you at 4 years old…”
- Family shoutouts: Siblings, grandparents, or close friends can share wishes or funny memories.
A trick I use:
Have everyone speak directly to the camera, as if it’s your child’s future self listening.
Remember: You don’t need to do it all. Even one edited clip saved today is a gift to tomorrow’s you.
The goal isn’t perfection—it’s bottling up the feeling of right now.
So, grab your phone, open that app, and start creating. Those little voices, toothy grins, and spaghetti-covered high chairs won’t wait!
How to Make a Family Video: Step-by-Step
Let’s turn those precious clips into a video you’ll love rewatching for years. No stress, no perfectionism—just you, your memories, and a little bit of magic.
Here’s how to do it, one simple step at a time:
- Gather Your Clips
- Choose Your Editing Tool
- Import Your Clips
- Arrange Your Story
- Trim and Simplify
- Add Transitions (Lightly!)
- Layer in Music
- Sprinkle Text and Titles
- Preview & Polish
- Export and Celebrate!
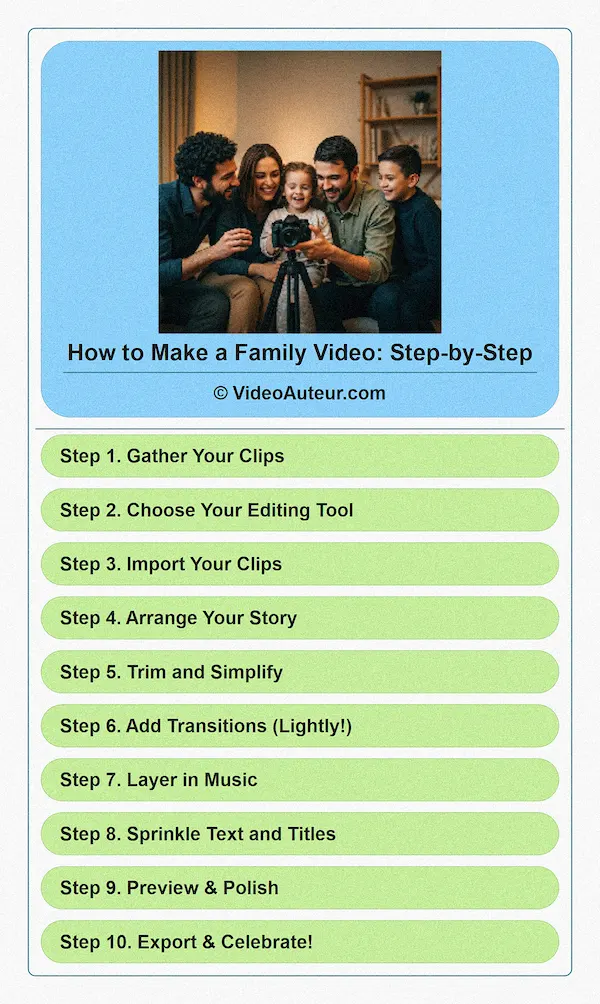 How to Make a Family Video: A Step-By-Step Guide
1. Gather Your Clips
Start by collecting all your videos and photos—like gathering ingredients for a favorite recipe. Don’t worry if they’re scattered across your phone, camera, or cloud storage. Just scoop them into one folder (remember our organization tips? 😉).
Pro tip: Include a mix of candid moments, smiles, and even a few “bloopers”—they add personality!
2. Choose Your Editing Tool
You don’t need fancy software. Pick one of these beginner-friendly options:
Smartphones:
- CapCut (free, intuitive, and packed with fun effects).
- iMovie (iOS) or VN Video Editor (Android/iOS) for simple drag-and-drop editing.
Computers:
- DaVinci Resolve (free, powerful, and great for learning).
- Clipchamp (free, browser-based, and super user-friendly).
Personal favorite:
I use CapCut for quick edits on my phone and DaVinci Resolve when I want to get creative on my laptop!
3. Import Your Clips
Open your chosen app and upload your videos and photos. Most apps let you drag files directly into a “media library” or click an “import” button. Think of it as unpacking a box of treasures.
4. Arrange Your Story
Drag clips into the timeline—the digital “storyboard” where your video comes to life. Two ways to organize:
- Chronologically: Perfect for trips, birthdays, or milestones (first steps leading up to first day of school).
- Thematically: Group by emotions or activities (lazy Sundays, holiday chaos, backyard adventures).
Keep it simple: Start with your strongest clip to hook viewers—like your child blowing out birthday candles.
5. Trim and Simplify
Less is more! Trim clips to 5–15 seconds each (unless it’s a heartfelt moment you want to linger). Delete shaky footage or repetitive scenes.
Pro tip: Watch the timeline at 1x speed—if your mind wanders, shorten the clip!
6. Add Transitions (Lightly!)
Transitions are like seasoning: A little goes a long way. Use simple fades or cuts between most clips. Save flashy spins or zooms for big moments (like revealing a surprise party).
7. Layer in Music
Background music sets the mood. Pick a song that matches your video’s vibe:
- Upbeat tunes for birthday parties.
- Soft piano for heartfelt moments.
Free music sources: YouTube Audio Library, Epidemic Sound (free trial), or even nature sounds!
⚠️ Caution: Avoid copyrighted music if sharing online—stick to royalty-free tracks.
8. Sprinkle Text and Titles
Add context with short text overlays:
- Dates (“Summer 2024”).
- Locations (“Grandma’s Backyard”).
- Quotes (“Best. Pancakes. Ever.”).
Keep fonts clean and easy to read—no neon Comic Sans, please. 😉
9. Preview & Polish
Watch your video from start to finish. Ask yourself:
- Does the story flow?
- Are any clips too long or jarring?
- Does the music fit?
Tweak until it feels right, but don’t obsess—imperfections make it feel real.
10. Export and Celebrate!
When you’re happy, hit “Export” and save your video as an MP4 (the universal format). Choose:
- 720p or 1080p for social media or texting.
- 4K if you want crisper quality for TV screens.
Then—pop some popcorn, gather the family, and hit play. You did it!
--
Remember: Your first video won’t be flawless, and that’s okay. The goal isn’t to win an Oscar—it’s to create something that makes your family say, “Remember when…?” Now go make some magic!
FAQs: Your Top Family Video Questions, Answered
How to preserve family videos long-term?
How to preserve family videos long-term?
Save your videos in three places. For example, phone/computer + cloud storage + external hard drive.
Store edited videos as MP4 (universally playable).
Keep one copy outside your home, like in a safety deposit box or a trusted relative’s house.
Pro tip: Burn a DVD or load a USB drive for grandparents—they’ll treasure it!
Where to upload family videos?
Where to upload family videos?
YouTube. Upload as “Unlisted” (only people with the link can view) or “Private” (shared with specific accounts).
You can indeed upload videos to YouTube as "Unlisted" or "Private." Here's a breakdown based on current YouTube functionality:
Unlisted:
- Videos set to "Unlisted" are not publicly searchable on YouTube.
- Anyone who has the direct link to the video can watch it.
- Unlisted videos can be shared with specific people without making them fully public.
- This is useful for sharing videos with a limited audience, such as friends, family, or colleagues.
Private:
- Videos set to "Private" are only visible to the uploader and specific YouTube accounts that the uploader chooses to share it with.
- Private videos do not appear in search results or on the uploader's channel page.
- This is the most restrictive privacy setting, ideal for personal videos or sensitive content.
How long should a family video be?
How long should a family video be?
Shorter is sweeter for everyday moments:
- 2–5 minutes: Ideal for birthday parties, vacations, or seasonal highlights.
- 5–10+ minutes: Save for milestones like graduations, weddings, or annual recaps.
Don’t stress about the clock—focus on quality over quantity. If your toddler’s hilarious cookie-monster impression runs 30 seconds? Let it shine!
What’s the best video format to save family videos?
What’s the best video format to save family videos?
Stick with MP4. It works on every device (phones, TVs, laptops) and keeps good quality even when compressed.
Conclusion: How to make a family video
Let’s end with a secret: The family videos you’ll treasure most won’t be the ones with perfect lighting or Oscar-worthy edits. They’ll be the ones where someone’s laughing so hard they snort, where the camera shakes as you chase a toddler with spaghetti hands, or where the dog photobombs Grandma’s heartfelt toast. Those are the moments that tell your story.
You don’t need fancy gear or a film degree to bottle up this magic. All you need is to hit “record” on the ordinary, the messy, and the joyfully unscripted. That’s where the real gold lives—not in polished perfection, but in the feeling of being together.
So go ahead: Film the pancake flip that lands on the floor. Save the clip of your teenager rolling their eyes (they’ll laugh at it in 10 years). Let the camera linger on the quiet moments, too—bedtime stories, sidewalk chalk art, or the way sunlight spills across the kitchen table.
Your family’s story is unfolding right now, frame by frame. And you? You’re the keeper of these memories. Whether you edit them into a montage or let them live as raw clips, what matters is that you start.
Today’s chaos is tomorrow’s nostalgia. What will you capture first?


